
Saturday, 25 February 2012
week two 2012
in this week we continued with the profiles and completed them before the day subsided after the profiles were done we began to clean the covered area and continued to clear this area up to satisfaction our tools were handed out to us excluding the drill set we were given a sketching exercise and started our site set out and wer given the opportunity to start the site plan and a critical path planning scheme for the house was drawn up and added to with the input of unit standards and when they had to be completed and also dates in which the path had to abide by the rest of the week consisted of completing the critical path plan to satisfaction and we wer given a plan for the house we were to be constructing

week one 2012
On this week we were taking through the introduction process where we were able to meet not only our class members but also able to meet the tutors that would have to put up with us in the duration of the year they went by the names Quesnall Harris and Brian Payne we were also fortunate to meet the head of department Derek
we were taken on a tour through the houses that are already in progress due to last years students and given a feel of what we were expected to do when we were done touring the houses we were then introduced to our working environment which was situated in R block on the southern campus we were given an induction sheet check list which had a list of tool we would acquire before commencement of the house also given to us was a lectures program outline and this gave us a fair idea of what to expect through the duration of the year in this week we were also provided with the log in information to help us get on to emit however nothing was present at this time the following day was made up us reconstructing our saw horse exercise for the remainder of the week we also were blessed to have in our presence the help of Helen who provided some information about the counselling services that M.I.T provided through a power point presentation the following day was the completion on the saw horse exercise and we received a helpful talking to by the sexual health advisory representative Peta Palalagi which was also presented in the form of a power point presentation and by the end of this week on we made a start on the profiles
we were taken on a tour through the houses that are already in progress due to last years students and given a feel of what we were expected to do when we were done touring the houses we were then introduced to our working environment which was situated in R block on the southern campus we were given an induction sheet check list which had a list of tool we would acquire before commencement of the house also given to us was a lectures program outline and this gave us a fair idea of what to expect through the duration of the year in this week we were also provided with the log in information to help us get on to emit however nothing was present at this time the following day was made up us reconstructing our saw horse exercise for the remainder of the week we also were blessed to have in our presence the help of Helen who provided some information about the counselling services that M.I.T provided through a power point presentation the following day was the completion on the saw horse exercise and we received a helpful talking to by the sexual health advisory representative Peta Palalagi which was also presented in the form of a power point presentation and by the end of this week on we made a start on the profiles
Sunday, 27 November 2011
WEEK FIFTEEN
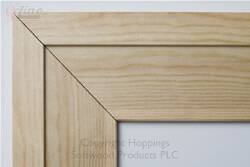 this week was spent fixing all the wall in the desired slots and screwed in place using a drill cordless drill and and posi drive then we went on to the architrave which is the piece that goes around the edges of the windows they are all cut at 45 degrees angles and made to fit similar to the one featured
 on the right
also the skirts were to be measured and cut to the right length before they were fixed how ever these were just square cuts like this one featured below these ran along the whole bottom of the sleep out and along the tops aswell

WEEK FOURTEEN
we recieved help form the soxx team with our ceiling using the rondo steel system
like the on featured on the left notice the steel running along the inside benneath the rafters thus creating a steel batten which the ceiling can be fixed to

after the rondo system has been applied to the ceiling in goes the insulation
which consists of R3.2

and then on top of the this will go the gib board which for the ceiling is 13mm standard

after the ceiling was in place we then used 10mm standard gib for the walls one side being standradr gid and the other being braceline
 (braceline)
Monday, 14 November 2011
WEEK THIRTEEN
on this week we had to complete the exterior battens on all the certain areas and also precise cut for the window flashing using chisels tho carve out a gap to make the batten sit flush we also spent time oin the lab in preparation for the presentation that is to be due in on the 16th
this man is installing exterior battens similar to the
one we used on the sleep out

Sunday, 6 November 2011
WEEK TWELVE
on this week we did more of the exterior we used 20mm thick ply wood for the wall and put in our windows aswell we also installed the flashing which goes above all window fixings made up of aluminium alos we installed the ranch sliding door
simlilar to the on featured below

picture of flashing below

below is 20 mm ply wood

Sunday, 30 October 2011
WEEK ELEVEN
this week was a short week we started on a tuesday and help the sox fix there rear exterior wall which was made up of colour steel iron we had to first put in the flashing on the bottom of rear wall on the exterior side then we had to measure the distance of in which we had to fix the 100mm hex head screws makis ure the iron was at the right hieght we maintianed thios by using a 20mmm packer underneath every sheet of iron put on after al the sheets for the exterior rear wall ahad gone up we went on to fixing the iron for the roof before we did this we had measure the distance of every perlin once we had that we had to drill the roof with the required distances then a black sheet was layed down and fixed to the top of the rafters with cloud nails once the black sheet was pinned to the rafters we used the iron sheets and fixed it in place with a 50mm overhang on the front and drilled it to the rafters using the same 100mm hex head screws that we used on the rear exterior wall


Subscribe to:
Posts (Atom)